Ajax Upload to Amazon AWS S3 Using jQuery & PHP
Previously in another post, I had created a uploader using simple HTML and PHP to upload files directly to Amazon AWS S3 server. In this tutorial, we will transform s3 uploader into Ajax based uploader using jQuery. Ajax makes it really easy for the user as the page doesn't need to be reloaded and we can also show a progress bar as the user waits for the upload to finish.Create User and Bucket
If you haven't done that, you can take a look at the instructions I have provided in my previous post. This should be confusing at first but will get easy after few tries.Set-up CORS configuration
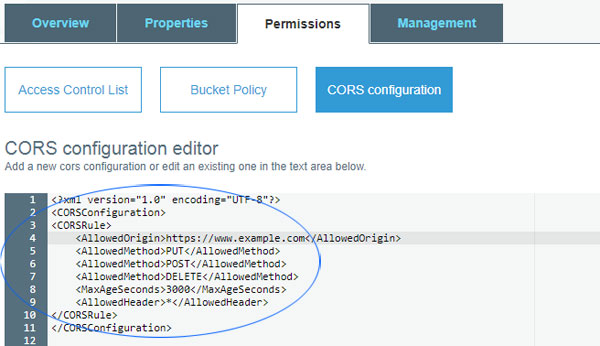
We must enable CORS (Cross-origin resource sharing) on our bucket to allows Ajax requests, otherwise, it is prohibited by default by the same-origin security policy. To enable CORS just go to your bucket permissions and click "CORS configuration" tab. You should be able to edit XML document containing CORS rules. Now replace the XML document rules with your own, you can copy and paste XML rules I've provided below, just change the AllowedOrigin to your own domain name :
XML
- 1
- 2
- 3
- 4
- 5
- 6
- 7
- 8
<CORSConfiguration>
<CORSRule>
    <AllowedOrigin>https://www.example.com</AllowedOrigin>
    <AllowedMethod>POST</AllowedMethod>
    <MaxAgeSeconds>3000</MaxAgeSeconds>
    <AllowedHeader>*</AllowedHeader>
</CORSRule>
</CORSConfiguration>HTML Form
Like in previous post, we create an HTML form using PHP. But this time we don't need to specify success_action_redirect (Where AWS redirects upon successful upload), instead we use success_action_status with value set to 201, which returns the XML document as response, exactly what we need for our Ajax form.PHP
- 1
- 2
- 3
- 4
- 5
- 6
- 7
- 8
- 9
- 10
- 11
- 12
- 13
- 14
- 15
- 16
- 17
- 18
- 19
- 20
- 21
- 22
- 23
- 24
- 25
- 26
- 27
- 28
- 29
- 30
- 31
- 32
- 33
- 34
- 35
- 36
- 37
- 38
- 39
- 40
- 41
- 42
- 43
- 44
- 45
- 46
- 47
- 48
- 49
- 50
- 51
- 52
- 53
- 54
<?php
$access_key 		= "iam-user-access-key"; //User Access Key
$secret_key 		= "iam-user-secret-key"; //secret key
$my_bucket			= "mybucket"; //bucket name
$region				= "us-east-1"; //bucket region
$allowd_file_size	= "1048579, 10485760"; //allows a file size from 1 to 10 MiB

//dates
$short_date         = gmdate('Ymd'); //short date
$iso_date           = gmdate("Ymd\THis\Z"); //iso format date
$expiration_date    = gmdate('Y-m-d\TG:i:s\Z', strtotime('+1 hours')); //policy expiration 1 hour from now
$presigned_url_expiry    = 3600; //Presigned URL validity expiration time (3600 = 1 hour)

$policy = array(
'expiration' => gmdate('Y-m-d\TG:i:s\Z', strtotime('+6 hours')),
'conditions' => array(
	array('bucket' => $my_bucket),
	array('acl' => 'public-read'),
	array('starts-with', '$key', ''),
	array('starts-with', '$Content-Type', ''),
	array('success_action_status' => '201'),
	array('x-amz-credential' => implode('/', array($access_key, $short_date, $region, 's3', 'aws4_request'))),
	array('x-amz-algorithm' => 'AWS4-HMAC-SHA256'),
	array('content-length-range', '1', $allowd_file_size),
	array('x-amz-date' => $iso_date),
	array('x-amz-expires' => ''.$presigned_url_expiry.''),
));

$policybase64 = base64_encode(json_encode($policy));

$kDate = hash_hmac('sha256', $short_date, 'AWS4' . $secret_key, true);
$kRegion = hash_hmac('sha256', $region, $kDate, true);
$kService = hash_hmac('sha256', "s3", $kRegion, true);
$kSigning = hash_hmac('sha256', "aws4_request", $kService, true);
$signature = hash_hmac('sha256', $policybase64 , $kSigning);
?>
<div class="form-wrp">
<div id="results"><!-- server response goes here --></div>
<form action="http://<?=$my_bucket?>.s3-<?=$region?>.amazonaws.com" method="post" id="aws_upload_form"  enctype="multipart/form-data">
<input type="hidden" name="acl" value="public-read">
<input type="hidden" name="success_action_status" value="201">
<input type="hidden" name="policy" value="<?=$policybase64?>">
<input type="hidden" name="X-amz-credential" value="<?=$access_key?>/<?=$short_date?>/<?=$region?>/s3/aws4_request">
<input type="hidden" name="X-amz-algorithm" value="AWS4-HMAC-SHA256">
<input type="hidden" name="X-amz-date" value="<?=$iso_date?>">
<input type="hidden" name="X-amz-expires" value="<?=$presigned_url_expiry?>">
<input type="hidden" name="X-amz-signature" value="<?=$signature?>">
<input type="hidden" name="key" value="">
<input type="hidden" name="Content-Type" value="">
<input type="file" name="file" />
<input type="submit" value="Upload File" />
</form>
</div>
</div>jQuery Ajax
Our HTML form is ready, let's transofrom it to Ajax so that users don't have to do full page refresh. In order to acomplish that we use jQuery.Ajax method, which provides us flexibility and core functionality of Ajax in jQuery.JQUERY
- 1
- 2
- 3
- 4
- 5
- 6
- 7
- 8
- 9
- 10
- 11
- 12
- 13
- 14
- 15
- 16
- 17
- 18
- 19
- 20
- 21
- 22
- 23
- 24
- 25
- 26
- 27
- 28
- 29
- 30
- 31
- 32
- 33
- 34
- 35
- 36
- 37
- 38
$("#aws_upload_form").submit(function(e) {
    e.preventDefault();
	the_file = this.elements['file'].files[0]; //get the file element
	var filename = Date.now() + '.' + the_file.name.split('.').pop(); //make file name unique using current time (milliseconds)
	$(this).find("input[name=key]").val(filename); //key name
	$(this).find("input[name=Content-Type]").val(the_file.type); //content type

    var post_url = $(this).attr("action"); //get form action url
    var form_data = new FormData(this); //Creates new FormData object
    $.ajax({
        url : post_url,
        type: 'post',
		datatype: 'xml',
        data : form_data,
		contentType: false,
        processData:false,
		xhr: function(){
			var xhr = $.ajaxSettings.xhr();
			if (xhr.upload){
				var progressbar = $("<div>", { style: "background:#607D8B;height:10px;margin:10px 0;" }).appendTo("#results"); //create progressbar
				xhr.upload.addEventListener('progress', function(event){
						var percent = 0;
						var position = event.loaded || event.position;
						var total = event.total;
						if (event.lengthComputable) {
							percent = Math.ceil(position / total * 100);
							progressbar.css("width", + percent +"%");
						}
				}, true);
			}
			return xhr;
		}
    }).done(function(response){
		var url = $(response).find("Location").text(); //get file location
		var the_file_name = $(response).find("Key").text(); //get uploaded file name
        $("#results").html("<span>File has been uploaded, Here's your file <a href=" + url + ">" + the_file_name + "</a></span>"); //response
    });
});